
How to shake up your lunch
If we think of food not as fuel but as nourishment, we start to think of the lunchbox in a different context. We are not just looking for foods to provide the calories we need or the energy we require but also the nutrients – vitamins, minerals, antioxidants – that can nourish the body. For example, calcium helps build bones, regulates blood pressure, keeps cells communicating and keeps muscles working optimally. Magnesium plays an important role in energy production, blood sugar control and muscle and nerve function. Anthocyanins in red and purple foods have neuroprotective effects and improve vision. None of these nutrients provide fuel. They do nourish the body though. We don’t want to miss out on the opportunity that lunchtime provides to nourish, not just refuel.
Over the past ten years, since my eldest child first went to school and I went out to work as a nutritionist running events and workshops all over the country, we’ve made countless lunchboxes as a family. After setting up Lunchbox Doctor, a business specialising in nutrition education, I feel like I have answered every conceivable question and objection regarding the subject of healthy lunchboxes.
My book, Real Lunchtime Food, book truly reflects that depth and breadth of experience. If you are looking for lunchbox inspiration and want to focus on taste and health when it comes to lunchtime choices, but don’t have much time on your hands, then keep reading. This is the book for you.
Lunchbox Planning Made Easy
Planning a balanced lunchtime meal doesn’t need to be difficult. However, the task is made harder by the number of foods marketed as ‘ideal for lunchboxes’ available in supermarkets and take-away food outlets, many of which are made up of refined carbohydrates, of low or poor protein value and lacking in nutrient density. It’s the misleading information and alluring messaging that surrounds us that makes balanced lunches harder to achieve. Yet, if we have learned one thing about nutrition from mainstream media in recent years, it is that refined carbohydrates leave us feeling low in energy just hours after we have eaten them and often lead us to crave more of the same.
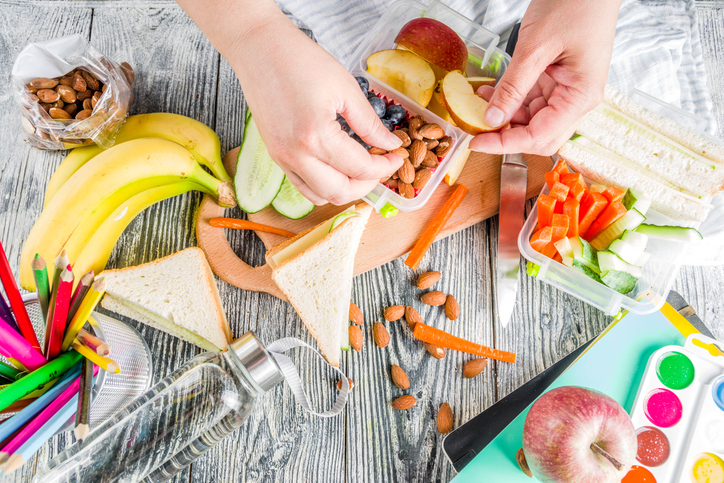
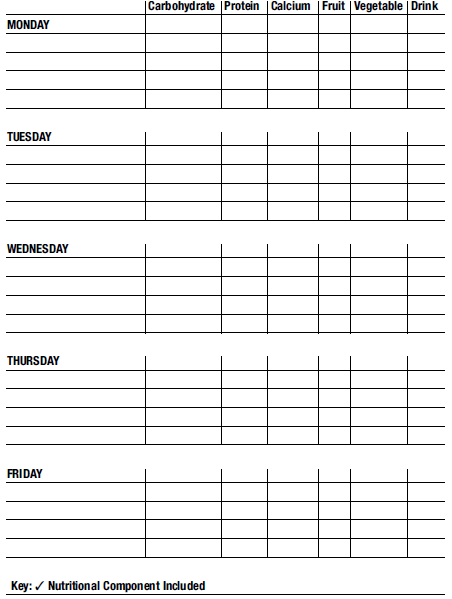
We need to be careful not to load our packed lunches with crisps, breads, cakes, biscuits, and, of course, we need to avoid too many added sugars. It’s also important to make sure we have enough protein, calcium, some vegetables, fruit and a drink too. There’s a mental checklist to go through so that you ensure your lunch is nutritionally balanced. Our lives are sufficiently busy already though, so if you find using a mental checklist adds to the load, then using a physical lunchbox-planning template can really help.
Lunchbox Bingo – a New Lunchbox Planning Framework
Lunchbox Bingo is a really simple planning template to help you make nutritionally balanced packed lunches. You might not use it for ever but it’s a great way of getting into the habit of planning a wellrounded, healthy meal on a daily basis. Lunchbox Bingo is also a great way of reinvigorating things whenever you find your lunches are becoming samey or when you find yourself falling back into familiar habits of sandwich plus accompaniments. An additional benefit to using this planning template is that you tend not to waste food because each day you know what is going into each lunchbox and you can buy the right amounts of the right kinds of food accordingly.
The Six Components of a Balanced Lunchbox
The six components of a balanced lunchbox fall into the following categories, each providing a
predominant health benefit:
- CARBOHYDRATE – energy foods
- PROTEIN – repair and growth foods
- CALCIUM – for strong teeth and bones
- FRUIT – to boost immunity
- VEGETABLE – to boost immunity
- DRINK – to improve concentration
How to Use Lunchbox Bingo
This process should inspire you to think of foods you’d like to eat each day of the week, while also ticking off the food groups that each food belongs to. For example, a Tuna Pasta Salad would tick off the following boxes: carbohydrate, protein, and if there were vegetables in there then the vegetable box too:

Ensure that on each day of the week there is at least one tick in each column so each of the food groups is covered. That equates to a full house in lunchbox bingo!
A whole lunchtime meal might look like this:
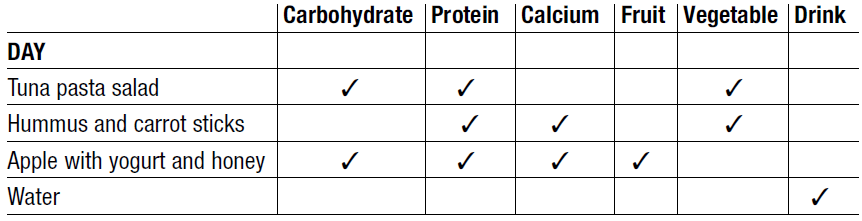
In order to effectively plan real lunchtime meals using the Lunchbox Bingo template (see below), it helps if you can develop an understanding of which foods fall primarily into which food group. For example, chicken is a protein and carrots are vegetables, while hummus is both a protein and provides calcium. A fruit and vegetable smoothie would be fruit, vegetable and a drink.
Lunchtime Bingo
Here are some recipes you might like to try to shake up your lunch.
Sweet Potato Crust Quiche
The sweet potato crust of this quiche contrasts deliciously with the creamy spinach and cheese filling. What’s more, there are vegetables in both the crust and the filling so it’s a win-win nutritionally. This recipe has been adapted from an original by Little Cooks Co, who provide healthy cooking kits for kids.
Serves 8
435g sweet potato, grated
60g Cheddar cheese
1 egg
A little olive oil, for greasing
Salt and pepper
Quiche filling
120g frozen spinach (frozen weight), defrosted
5 eggs
75g Cheddar cheese
100ml cream
- Preheat the oven to 190°C/Fan 170°C/Gas 5.
- Squeeze the grated potato through a muslin to remove the excess liquid.
- Mix the sweet potato together with the cheese, egg and seasoning.
- Grease and line a 25 x 15cm baking tin with greaseproof paper.
- Push the ‘dough’ into the base of the tin to make the quiche base. Then bake for 20 minutes.
- In another bowl, mix all the filling ingredients together. Add these to the pre-baked quiche base and bake for another 20 minutes. Remove and cover the quiche with foil to prevent the crust from burning and cook for another 20 minutes, until the egg is cooked through. Cool then serve.
Chickpea and Vegetable Curry
Chickpeas are another filling vegetarian protein. They are extremely versatile and commonly used in Asian and Middle Eastern cuisine. This curry recipe is very simple with few ingredients and even fewer steps. You can certainly jazz it up a bit. I like to add more vegetables, but I appreciate not everyone loves to see lots of green in their curry.
Serves 2–4
1 tbsp olive oil
1 onion, diced
1 garlic clove, crushed
1 heaped tsp medium curry powder
½ a courgette, diced to the same sized pieces as the onion (optional)
1 x 400g tin of chickpeas, drained and rinsed
½ x 400g tin of chopped tomatoes
½ tsp salt or half a vegetable stock cube
100g fresh spinach, rinsed and dried
- Heat the oil in a medium-sized saucepan.
- Sauté the onion for 5 minutes.
- After 5 minutes add the garlic and the curry powder. Stir.
- Stir in the courgette, chickpeas and tomatoes with 125ml of water, the salt or ½ a vegetable stock cube, and the spinach.
- Bring to the boil (pushing the spinach into the saucepan as you go until it has wilted) then reduce the heat and simmer for 20 minutes, until the sauce is significantly reduced. Place in warmed flasks.
Halloumi (Baked) Fries
Halloumi has a rare texture for a cheese. Some claim it makes a squeaky sound when they eat it. These cheesy fingers are packed full of flavour and texture. Whether you find them squeaky or not, you’re sure to enjoy these unique ‘fries’.
Makes about 20
250g halloumi cheese
¼–½ tsp sweet smoked paprika, to taste
40g coconut flour
1 large egg
- Preheat the oven to 180°C/Fan 160°C/Gas 4.
- Line a baking tray with greaseproof paper.
- Slice the halloumi into 2cm sticks.
- Mix the paprika and coconut flour in a bowl. Coat the halloumi sticks in the flour mix.
- Crack open the egg in a bowl and whisk with a fork.
- Dip the coated halloumi into the egg, shake off any excess then carefully roll again in the remaining paprika and coconut flour mix. Place the coated halloumi sticks on to the prepared baking tray.
- Bake for 17–18 minutes, turning once during cooking. They should be golden brown and crunchy on the outside. Cool then serve in your lunchbox.
'Some fantastic tips for those who have got stuck in a lunchbox rut and need genuinely inspiring, healthy recipe ideas' - Amelia Freer, nutritional therapist and bestselling author
Are you tired of the same old sandwich, crisps and yoghurt combination? Do you struggle to find time for meal prep? Concerned that you and your family aren't eating a healthy, nutritious lunch?
That's where this book comes in.
Jenny Tschiesche's Real Lunchtime Food is the perfect guide for working adults and parents who want healthier and more inspiring meals than the traditional packed lunch we have come to expect. It contains deliciously simple recipes and practical nutritional information and advice that will put you back in control of your lunch. Also included are tips on how to shop smart, how to make use of leftovers, as well as tips on environmentally-friendly packaging solutions to help you transport your lunch to work or school.
This is not a book about stale sandwiches and soggy salads. It is about a healthier, achievable lifestyle. Real Lunchtime Food is about stocking the store cupboard with good quality, readily available foods, having some basic equipment available, being empowered to take control of your family's daily food and involving them in making their own health choices. Lunchtime is an opportunity to enjoy a delicious and nutritious meal. This book will make that a possibility on a daily basis.
Jenny is the founder of LunchboxDoctor.com. Her career as a nutritionist has seen her work with Olympic athletes; design recipes for the likes of the BBC, Cancer Research and Premiership Rugby amongst many others; and make regular appearances in the national press as a nutrition expert.